I'm not going to bore you with the details because this is pretty self explanatory. Use heavy weight black construction paper, trace, cut and then glue along a length of invisible jewelry cord...suspend from the ceiling and voila instant spooky!

Found a vintage Sligh-Lowry revival style desk from around 1960 to do over. The problem was I don't need a desk or have room for one. I couldn't pass it up though, I really liked the shape and the hardware. It also had so much versatility being that the round side
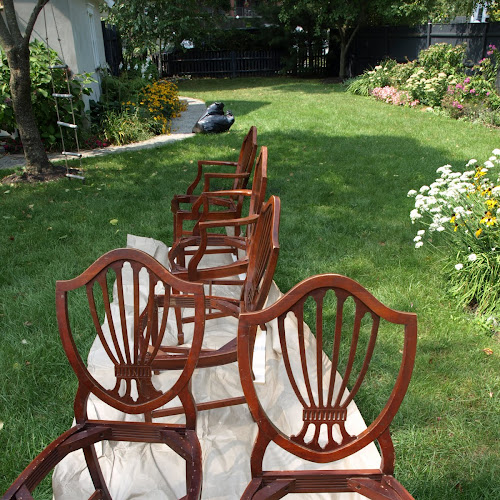
I was on the lookout for awhile for federal style shield back chairs to rehab and this past spring I found some.
I scored 6 shield backs on craigslist. I paid $150 for the six chairs, the bonus was they came with a pretty cool federal style dining table
I scored 6 shield backs on craigslist. I paid $150 for the six chairs, the bonus was they came with a pretty cool federal style dining table
It's that time of year again... Birthday time! As much as a hem and haw when my daughter's birthday comes around I love the challenge of coming up with the details after she comes up with the theme. This year it was a luau. Aside from the standard pizza
If you're lazy like me, you left your terracotta pots outside all winter and they most likely cracked. Cracked and wired sounds like a whole different blog! Well, I couldn't part with some of those cracked pots but I also couldn't risk them falling apart and seeing dirt

Cool summer nights scream fire pits and campfires. You really can't have a fire without marshmallows...it's like having cookies without milk or a movie without popcorn...or....I could go on and on. I won't fault you for whipping out the bag of Jet Puff, I've done it many times, but trust me when I tell you this; nothing compares to marshmallows made from scratch. You need to try making them at least one time this summer. It can be a little messy but it's definitely not difficult or scary. This recipe makes fluffy, chewy, melt in your mouth marshmallows...and best of all they taste incredible toasted over a fire. (Recipe below)


In in a large heat safe bowl sprinkle gelatin over 1/2 cup cold cold water, and let stand to soften.


I used a cookie sheet because I couldn't find my small metal pan, so these came out a little flatter then usual and obviously I wasn't able to fill the large cookie sheet with the amount in this recipe so I ended up with a little island of marshmallow in the middle of the pan. Worked out fine though. Just had to trim it to get squares after it set up.

My marshmallow island below sprinkled with confectioner sugar and ready to be refrigerated to set up.

Finished!

Eat your heart out Jet Puff! You can see the airy texture of these in the photo below.

Enjoyed by the fire.

Recipe:
1 cup confectioners’ sugar
3 1/2 envelopes (2 tablespoons plus 2 1/2 teaspoons) unflavored gelatin
1 cup cold water, divided into 1/2 cups
2 cups granulated sugar
1/2 cup light corn syrup
1/4 teaspoon salt
2 large egg whites
1 tablespoon vanilla
1 cup cold water, divided into 1/2 cups
2 cups granulated sugar
1/2 cup light corn syrup
1/4 teaspoon salt
2 large egg whites
1 tablespoon vanilla
Oil bottom and sides of a 13- by 9- by 2-inch rectangular metal baking pan and dust bottom and sides with some confectioners’ sugar.
In in a large heat safe bowl sprinkle gelatin over 1/2 cup cold cold water, and let stand to soften.
In a heavy saucepan cook granulated sugar, corn syrup, second 1/2 cup of cold water, and salt over low heat, stirring with a wooden spoon until sugar is dissolved. Increase heat to moderate and boil without stirring, until a candy or digital thermometer registers 240°F, about 12 minutes.
Remove pan from heat and pour sugar mixture over gelatin mixture, stirring until dissolved.
Remove pan from heat and pour sugar mixture over gelatin mixture, stirring until dissolved.
Beat mixture on high speed until white, thick, and nearly tripled in volume, about 10-15 minute.
In separate medium bowl with cleaned beaters beat egg whites until stiff peaks form.
Beat whites and vanilla (or your choice of flavoring and any coloring if you want colored marshmallows) into sugar mixture until just combined.
Pour mixture into baking pan. Don't wrestle and fuss to get it all out of the bowl into pan...it's sticky and this is how you could end up with a mess. Pour out what pours out and leave what sticks in the bowl in the bowl (let the dirty bowl soak in soapy water).
Sift 1/4 cup confectioners sugar evenly over top. Chill marshmallow uncovered until firm (at least 3 hours, and up to one day)
To remove, run a thin knife around edges of pan and invert pan onto a large cutting board. Lifting up one corner of inverted pan, with fingers loosen marshmallow and ease onto cutting board. With a large knife dipped in confectioners sugar, trim edges of marshmallow and cut marshmallow into roughly one-inch cubes. Toss marshmallows in remaining confectioners sugar.
Fresh flowers are great additions to indoor spaces. Alas, they are expensive and don't last very long, but if you have a garden, there's an abundance of blooms this time of year that can be enjoyed indoors. I prefer to keep arrangements simple, single stems or unstructured bunches look organic and stunning. Simplicity works well even if you don't have a garden to gather a huge bouquet in.

You don't even need a collection of vases for your indoor arrangements. Practically any container can work. This fern is in a root beer bottle that was washed and label removed.

Try displaying a branch from a small leafy tree or shrub in a large bottle or jug. You can take a walk and haphazardly gather a few wild flowers. A spray of seeding grass in a small vase works well or perhaps some moss in a low bowl....or a single fern leaf in a soda bottle like the one above. Whatever it is, gathering and displaying can add color, texture and joy to your indoor decor.
You don't even need a collection of vases for your indoor arrangements. Practically any container can work. This fern is in a root beer bottle that was washed and label removed.

Recipe:
2 8oz packages cream cheese
3 teaspoons lemon juice
1/2 stick butter
1 cup sugar
3 eggs
8 graham crackers
3/4 cups chopped nuts
Butter a 9 inch square pan and dust with graham cracker crumbs. Mix crushed graham crackers with melted butter and nuts. Beat cream cheese with eggs. gradually add sugar and lemon juice. pour into pan and sprinkle with graham cracker topping.
Bake in 325 degree preheated oven for 30 minutes.
Yeah garden before and afters! I've spent allot of time and considerable effort transforming a highly dumpy lot of land into a place you might not feel like you need a tetanus to walk around in. When I look back at these before pictures I wince and I'm not sure I could do this whole process again. Aside from some compost and watering, a little weeding and dividing now and again, my garden is finally pretty low maintenance. I'm not going to lie, it took years of work...getting down and dirty and allot of Advil! Come take a look.


Before (Nope I'm not joking)


The Garage (I can't even look!)


Now that you've seen the horror show, here is what it looks like today:
The Trees

(From top left clockwise: Japanese Lilac, Japanese Maple with tire swing hanging on White Pine, European White Birch, Yoshino Cherry in summer, Yoshino Cherry in spring)
The Views


(Ahhh now I can look at the garage and even call it a carriage house.)
The Objects

The Places To Rest

The Close-ups


 |
One big furniture trend right now is weathered and bleached wood furniture, like driftwood. I like the look because it's light, but some of the pieces I've been eyeing are thousands of dollars.
I've been holding onto this knotty yellow pine armoire not because I liked it, but because it was the first piece of furniture I bought when I was on my own. The longer it hung around though, the more outdated it started to look especially in the airy sun room. It was the perfect Guinea pig to try a do-it-yourself driftwood look.
I used Benjamin Moore paint in "Smoke Embers" in an eggshell finish and cut it with a little water to make a glaze. Since the armoire was rustic and didn't have much of a finish on it at all, it took really well to the glaze. I rubbed it on with a rag and then wiped it off with a clean rag forcing it into the grain. Yup that's it! Even I expected to have to glaze over with a darker color and then a lighter color, then perhaps do some sanding. But the glaze was all it needed and the process went really quickly. The whole project took no more then and hour and it's a big piece of furniture. When I have a some extra time, I'll likely throw a coat of paste wax on it. So, if you have any of this knotty pine circa 1995, grab the paint and water and glaze away!


Cherry Cupcakes

Cupcakes:
2 1/4 cups cake flour
1 1/2 cups sugar
3 teaspoons baking powder
1/4 teaspoon of salt
1 1/2 sticks unsalted butter, room temperature, cut into 1 inch pieces
3/4 cup cherry puree
4 egg whites
1/3 cup milk
red food coloring (optional)
For the frosting:
1 8oz package cream cheese, room temperature
1 stick unsalted butter, room temperature
3-4 cups confectioners sugar
1 teaspoon vanilla extract
1 8oz package cream cheese, room temperature
1 stick unsalted butter, room temperature
3-4 cups confectioners sugar
1 teaspoon vanilla extract
Directions:
- Preheat oven to 350 degrees. Line cupcake pan with paper liners.
- In a large mixing bowl, place the flour, sugar, baking powder and salt. Blend for 30 seconds with an electric mixer.
- Add the butter and cherry puree. Mix until blended. Once blended, increase the speed of the mixer and beat until light and fluffy, approximately 2 to 3 minutes. The batter will be thick and creamy.
- Add a few drops of red food coloring, if using.
- In a separate bowl, whisk together the egg whites and the milk. The mixture will be slightly frothy.
- Add the egg mixture in two additions. Scrape the bowl after each addition. Only mix to fully incorporate. Do not over mix.
- Scoop the batter into the prepared muffin pan.
- Bake 14-15 minutes or until a toothpick inserted in the center of a cupcake comes out clean. Allow the cupcakes to cool in the pan for a few minutes before removing to a wire rack.
To make the frosting:
-Mix together the softened cream cheese and the butter until smooth.
- Add the confectioners’ sugar 1 cup at a time. Scrape down bowl after each addition.
- Mix in the vanilla extract.
- Frost cupcakes when they are completely cooled.
Makes approximately 50 mini-cupcakes.
I don't think these chairs could have been any more ugly. I picked them up for $5 a piece and I even questioned myself as to why I'd do such a thing. They spent 2 months stacked in the basement while I agonized about what to do with them besides throw them on the curb. They needed something very different from the ugly honey color they were wearing. The Windsor shape was calling to be painted in a standard black....but I wasn't looking for standard. I was looking for aluminum, yup you heard me right. Sometimes crazy just works.
Before


I used Rustoleum metallic silver spray paint to make my ugly chairs heart-able. I lightly sanded first and didn't bother to prime (gasp! they're fine!).

Before

After

I used Rustoleum metallic silver spray paint to make my ugly chairs heart-able. I lightly sanded first and didn't bother to prime (gasp! they're fine!).

I love outdoor teak because it's practically indestructible and when left to weather takes on a really cool gray patina. These chairs however weathered a little too much for my taste and the person selling them for just $70 for four arm chairs and a bench! I felt like I was stealing them. All they needed was some sanding to give them a fresh look. Which brings me to the other great thing about teak, no matter how old, it can be either washed or sanded (depending on how weathered it is) and look brand new again. I sanded and was happy with the color and texture I got. If you want a richer color, outdoor teak can be oiled after washing or sanding with tung or mineral oil.


Before

After


I've used my share of chalkboard paint in the past. Painted my laundry back-splash with it and painted a large section of it on my fence outside. I had more than a little left over sitting in the can in the basement for awhile. What to do? Well, I went a little nuts with it..... on bottles, shells and even rocks. Chalkboard paint can even be custom colored now, so there's no excuse not to give it a try. Although, I admit I'm a chalkboard paint purist myself and prefer black with white chalk.


I used glass primer on the bottles and taped off the areas to be painted. Here are my larger chalkboard projects below:


I admit it, I have a crush on burlap. I had a bunch on hand so I decided to use it to give some of beat up journals a new look for the coffee table.

Burlap is cheap as far as fabrics go, a little over a $1 a yard or cheaper if you pick it up at the hardware or garden store. If you're lucky you can grab coffee sacks at your local coffee shop. The weave can be tightened and softened by washing it in hot water and then machine drying. You'll need to clean the lint catch a few times, this stuff sheds...big time!
Once it's softened, cut it slightly larger than the book you are trying to cover. Notch out the area on top of the binding as shown above so the edges can fold into the book. Using plenty of hot glue, attach the burlap starting in the middle at the binding. Fold the tops and bottoms inside the cover and secure with hot glue. You can cover the rough edge on the inside of the book by gluing ribbon along the edge or simply cut out another straight square of burlap and glue to the inside cover over the folded in edges.
You could add a twine bookmark and wooden button if you're feeling ambitious or try rubber stamping with a design or monogram.
I fell in love with these when I saw them on craigslist. The design on the back was totally unique and for $25 for two arm chairs and 3 side chairs who could pass them up? I can always use extra chairs.
The wood was more then a little beat up so they were destined for Rustoleum spray paint in Putty. For the seat cover fabric, I found grey embroidered drapes on clearance and chopped them up to cover the ugly old dirty cushions. I find that drapes, sheets, tablecloths etc. can be a good alternative to pricey fabrics at the fabric store.


The wood was more then a little beat up so they were destined for Rustoleum spray paint in Putty. For the seat cover fabric, I found grey embroidered drapes on clearance and chopped them up to cover the ugly old dirty cushions. I find that drapes, sheets, tablecloths etc. can be a good alternative to pricey fabrics at the fabric store.
Before

After

Lately, I love finding unique, well made pieces of furniture and giving them a second chance. I think it all started with the computer armoir for my daughter last Christmas. People are practically giving away furniture that is crafted from solid wood with dovetail construction. I purchased both of the pieces below for under $35 each on http://www.craigslist.com/. Sand paper, wood fill and paint totaled $30.
I remove knobs and hardware, and lightly sand to rough up the surface for paint. Below you can see that one of the drawers had a large chip that I filled with wood fill and sanded smooth. Once painted you can't tell it had ever been broke. I also like to add drawer liners to protect the inside of the drawers, plus it's pretty and I like pretty!


Bureaus and chests of drawers like these can be used in any room. The one above will be used in a dining area to store linens and silverware. I spray primed these with Rustoleum and painted with an oil based paint in a semi-gloss finish.
After the animal print frosting disaster with Kenna's birthday cake, I'm ready to hang up my cake making hat. It has became incredibly clear that I have NO idea what I'm doing! The circus cake below is officially my last cake, I'm frustrated with it, I'm an impatient perfectionist and that's probably not a combo suitable to cake decorating. Maybe cupcakes from now on.
The cake is a circus theme and covered in white chocolate that was first spread onto an acetate sheet. The chocolate is cooled, then wrapped around a frosted cake to create a smooth shiny finish.


The cake is a circus theme and covered in white chocolate that was first spread onto an acetate sheet. The chocolate is cooled, then wrapped around a frosted cake to create a smooth shiny finish.