Found a vintage Sligh-Lowry revival style desk from around 1960 to do over. The problem was I don't need a desk or have room for one. I couldn't pass it up though, I really liked the shape and the hardware. It also had so much versatility being that the round side
Showing posts with label
Before and After
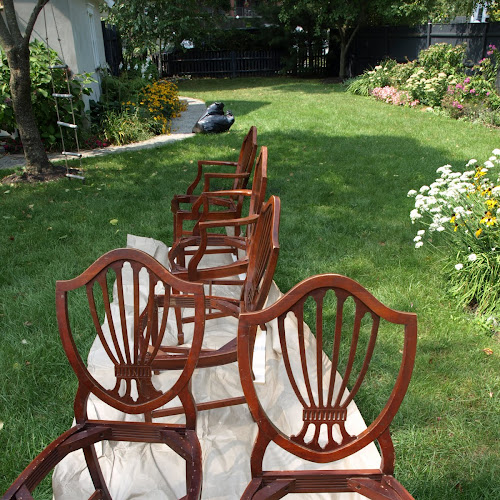
I was on the lookout for awhile for federal style shield back chairs to rehab and this past spring I found some.
I scored 6 shield backs on craigslist. I paid $150 for the six chairs, the bonus was they came with a pretty cool federal style dining table
Yeah garden before and afters! I've spent allot of time and considerable effort transforming a highly dumpy lot of land into a place you might not feel like you need a tetanus to walk around in. When I look back at these before pictures I wince and I'm not sure I could do this whole process again. Aside from some compost and watering, a little weeding and dividing now and again, my garden is finally pretty low maintenance. I'm not going to lie, it took years of work...getting down and dirty and allot of Advil! Come take a look.
Before (Nope I'm not joking)
The Garage (I can't even look!)
Now that you've seen the horror show, here is what it looks like today:
The Trees
(From top left clockwise: Japanese Lilac, Japanese Maple with tire swing hanging on White Pine, European White Birch, Yoshino Cherry in summer, Yoshino Cherry in spring)
The Views
(Ahhh now I can look at the garage and even call it a carriage house.)
The Objects
The Places To Rest
The Close-ups
![]() |
One big furniture trend right now is weathered and bleached wood furniture, like driftwood. I like the look because it's light, but some of the pieces I've been eyeing are thousands of dollars.
I've been holding onto this knotty yellow pine armoire not because I liked it, but because it was the first piece of furniture I bought when I was on my own. The longer it hung around though, the more outdated it started to look especially in the airy sun room. It was the perfect Guinea pig to try a do-it-yourself driftwood look.
I used Benjamin Moore paint in "Smoke Embers" in an eggshell finish and cut it with a little water to make a glaze. Since the armoire was rustic and didn't have much of a finish on it at all, it took really well to the glaze. I rubbed it on with a rag and then wiped it off with a clean rag forcing it into the grain. Yup that's it! Even I expected to have to glaze over with a darker color and then a lighter color, then perhaps do some sanding. But the glaze was all it needed and the process went really quickly. The whole project took no more then and hour and it's a big piece of furniture. When I have a some extra time, I'll likely throw a coat of paste wax on it. So, if you have any of this knotty pine circa 1995, grab the paint and water and glaze away!
I don't think these chairs could have been any more ugly. I picked them up for $5 a piece and I even questioned myself as to why I'd do such a thing. They spent 2 months stacked in the basement while I agonized about what to do with them besides throw them on the curb. They needed something very different from the ugly honey color they were wearing. The Windsor shape was calling to be painted in a standard black....but I wasn't looking for standard. I was looking for aluminum, yup you heard me right. Sometimes crazy just works.
I love outdoor teak because it's practically indestructible and when left to weather takes on a really cool gray patina. These chairs however weathered a little too much for my taste and the person selling them for just $70 for four arm chairs and a bench! I felt like I was stealing them. All they needed was some sanding to give them a fresh look. Which brings me to the other great thing about teak, no matter how old, it can be either washed or sanded (depending on how weathered it is) and look brand new again. I sanded and was happy with the color and texture I got. If you want a richer color, outdoor teak can be oiled after washing or sanding with tung or mineral oil.
I fell in love with these when I saw them on craigslist. The design on the back was totally unique and for $25 for two arm chairs and 3 side chairs who could pass them up? I can always use extra chairs.
The wood was more then a little beat up so they were destined for Rustoleum spray paint in Putty. For the seat cover fabric, I found grey embroidered drapes on clearance and chopped them up to cover the ugly old dirty cushions. I find that drapes, sheets, tablecloths etc. can be a good alternative to pricey fabrics at the fabric store.
Before
After
Lately, I love finding unique, well made pieces of furniture and giving them a second chance. I think it all started with the computer armoir for my daughter last Christmas. People are practically giving away furniture that is crafted from solid wood with dovetail construction. I purchased both of the pieces below for under $35 each on http://www.craigslist.com/. Sand paper, wood fill and paint totaled $30.
I remove knobs and hardware, and lightly sand to rough up the surface for paint. Below you can see that one of the drawers had a large chip that I filled with wood fill and sanded smooth. Once painted you can't tell it had ever been broke. I also like to add drawer liners to protect the inside of the drawers, plus it's pretty and I like pretty!

I remove knobs and hardware, and lightly sand to rough up the surface for paint. Below you can see that one of the drawers had a large chip that I filled with wood fill and sanded smooth. Once painted you can't tell it had ever been broke. I also like to add drawer liners to protect the inside of the drawers, plus it's pretty and I like pretty!

My thrifty Christmas gift this year (Santa ended up getting all the credit) was an armoire I found on craigslist for $25. It seemed pretty solid and...heck it was only $25! The idea was to transform it into a work station/desk for Kenna (she's 6 and loves to play school). Later, she can use it as a computer desk.
The before picture below is the actual photo that was posted on craigslist. I was hopeful from the photo that it had good bones and as it turned out, it had okay bones. It was getting paint and new shelves so there was nothing allot of sanding couldn't handle. Sanding this was far less horrendous then I thought and yet there was still swearing.

I tried Benjamin Moore's new expensive Aura paint. The benefits were that it was self priming and that it leveled really well (meaning no brush strokes). However, when using it as a primer, the first coat was akin to spreading on white glue (this stuff is thick and not like any other paint, read the application instructions first!). Also, it dried so quickly that over working it was not only impossible but disastrous.
I painted the inside pink. If it was for me, I would have painted the inside lime green! Both door interiors were primed with "Magnetic" primer, which is a primer with metal suspended in it to allow magnets to stick to any surface its painted on. One door interior got chalk board paint. Not shown in the photo, because it wasn't yet attached, is a desk piece that folds down on a piano hinge ...the elf was tired and Santa wouldn't get his white gloves dirty so he stuck it behind the cabinet with instructions on how to install it later. (The name isn't painted on the armoire, they are just wooden block letters).